Files
General Download - Postman collection.postman_collection.json
This collection contains working examples of all supported API flows and document types.
Stratech Shipment Download - Stratech Shipment Acceptance.postman_environment.json
This environment contains the configuration required to connect to the **Acceptance (Test)** environment. Download - Stratech Shipment Production.postman_environment.json
This environment contains the configuration required to connect to the **Production** environment.
Beurtvaartadres ShipmentManager Download - Beurtvaartadres ShipmentManager Acceptance.postman_environment.json
This environment contains the configuration required to connect to the Beurtvaartadres**Acceptance (Test)** environment. Download - Stratech ShipmentManager Production.postman_environment.json
This environment contains the configuration required to connect to the Beurtvaartadres **Production** environment.
Introduction
This article explains how to configure Postman to test the Shipment API.
Three JSON files are provided that contain the required environments and example requests.
Once the files have been imported and configured, you can use the included examples to test all available API flows and document types.
The provided JSON datasets also help you understand the required structure and formatting of the data sent to Shipment.
The example datasets included in the collection are fully functional examples and can be used as a reference when building your own integrations with the Shipment API.
By comparing your payloads with the provided examples, you can quickly identify formatting or data structure issues before implementing them in your ERP system.
Create a New Workspace in Postman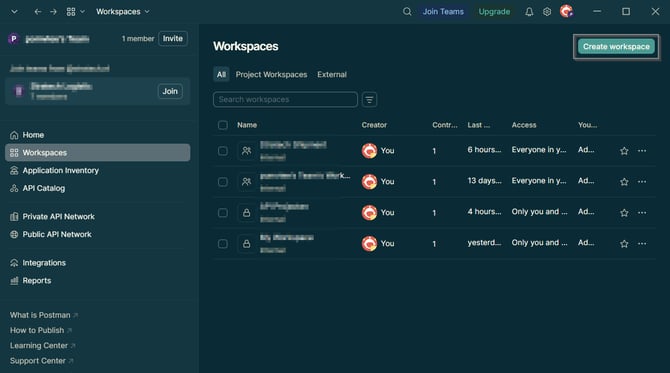
Before importing the files, it is recommended to create a dedicated workspace.
Create a Workspace
1. Open Postman.
2. Select **Workspaces** in the top-left corner.
3. Click **Create Workspace**.
4. Enter a name, for example: **Shipment API Testing**.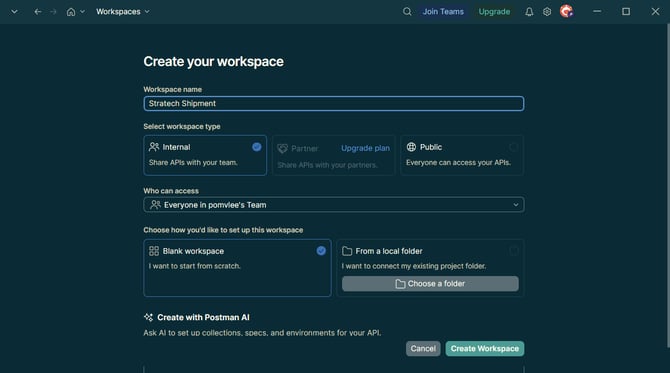
5. Select the desired visibility.
6. Click **Create Workspace**.
Import the JSON Files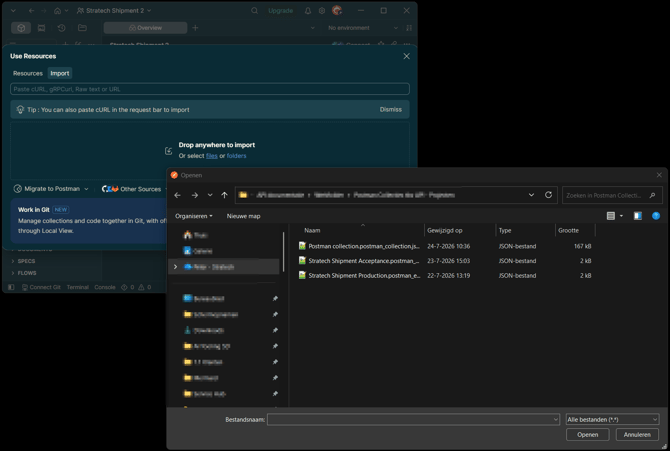
Import all provided JSON files into your Postman workspace.
Option 1: Drag and Drop
Drag the JSON files directly into Postman.
Option 2: Import Dialog
1. Press CTRL + O.
2. Select the JSON files.
3. Click Open.
After importing:
The collection will appear under **Collections**.
The environment files will appear under **Environments**.
Configure the Environment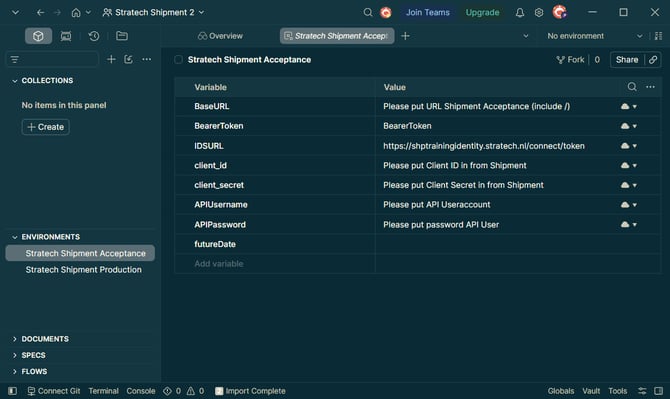
Navigate to "Environments" and select the environment you want to configure.
Configure the following variables.
BaseURL:
Enter the URL of the environment you want to use:
- Shipment Acceptance URL
- Shipment Production URL
Important:
Always include the trailing forward slash (`/`) at the end of the URL.
Example: https://test.stratechshipment.nl/
Authentication for KvK Documents
If you are testing KvK-related documents, configure the following variables.
`APIUsername` : Enter the email address of the dedicated Public API account or Administrator account.
`APIPassword`: Enter the password belonging to the account above.
Authentication for Other Declarations and Documents
For all other declarations and document types, an ERP account must be created first.
Generate ERP Credentials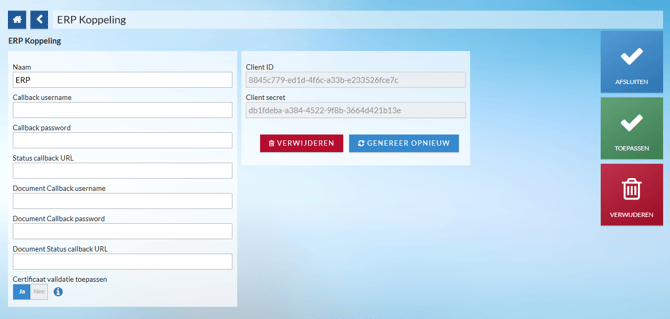
In Shipment, navigate to:
1. Beheer
2. Instellingen
3. ERP Koppelingen
4. Import
5. Nieuwe ERP koppeling
Then perform the following steps:
1. Enter a name for the ERP connection.
2. Click **Toepassen**.
3. Click **Genereer**.
4. Confirm the message by clicking OK:
When generating the client credentials, the client secret will only be shown once and cannot be retrieved afterwards.
The new credentials must also be updated in the ERP system.
5. Copy and secure the generated **Client ID**.
6. Copy and secure the generated **Client Secret**.
7. Click **Apply** again to save the configuration.
Configure the Variables in Postman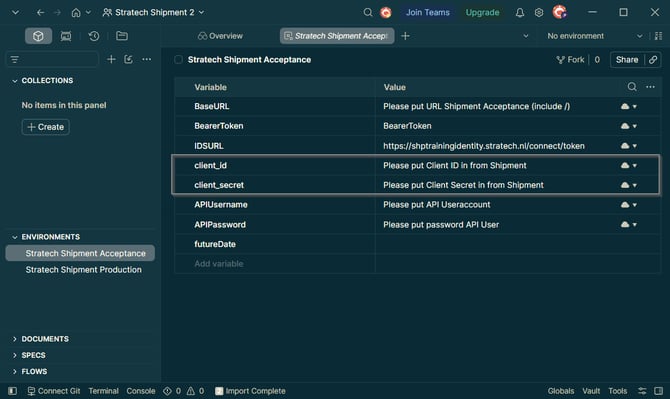
`client_id` : Enter the generated Client ID.
`client_secret`: Enter the generated Client Secret.
Execute a Test Request
After configuring the environment and importing the JSON Collection, you can start testing:
1. Navigate to **Collections**.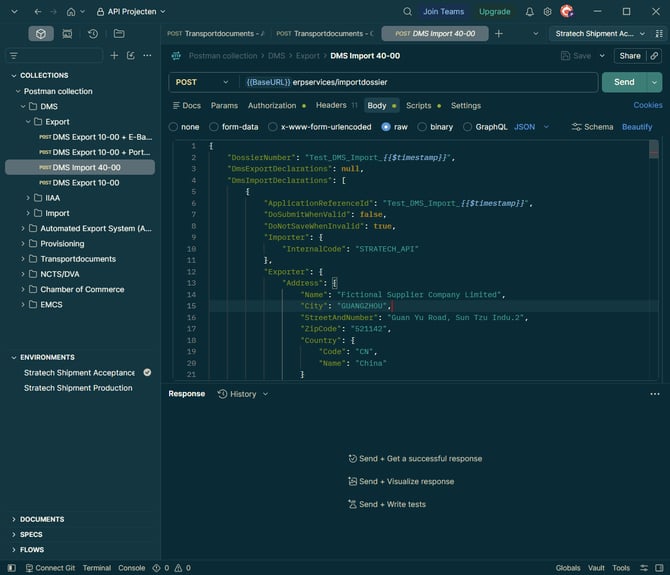
2. Open **Postman collection**.
3. Select the environment in the top-right corner:
- Stratech Shipment Acceptance
- Stratech Shipment Production
4. Open the flow or document type you want to test.
Example:
DMS
└─ Export
└─ DMS Export 10-00
You will see a request similar to:
POST erpservices/importdossier
Verify and set the Internal Code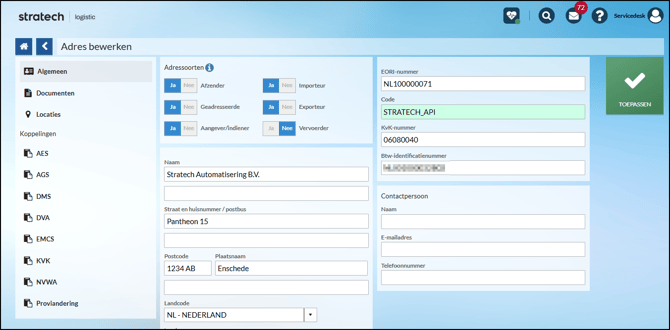
Within Shipment, every party can be assigned an Internal Code.
Shipment will automatically retrieve the associated declarant
information from the address book.
This is especially useful for parties that are used frequently, such as:
- Declarant
- Consignor
- Consignee
- Place of Delivery
- Place of Loading
- Other recurring parties
In the example datasets included in the Postman Collection, the declarant is referenced using the Internal Code "STRATECH_API".
Now, the declarant can be referenced as follows:
 "consignor": {
 "internalCode": "STRATECH_API"
 },
Send the Request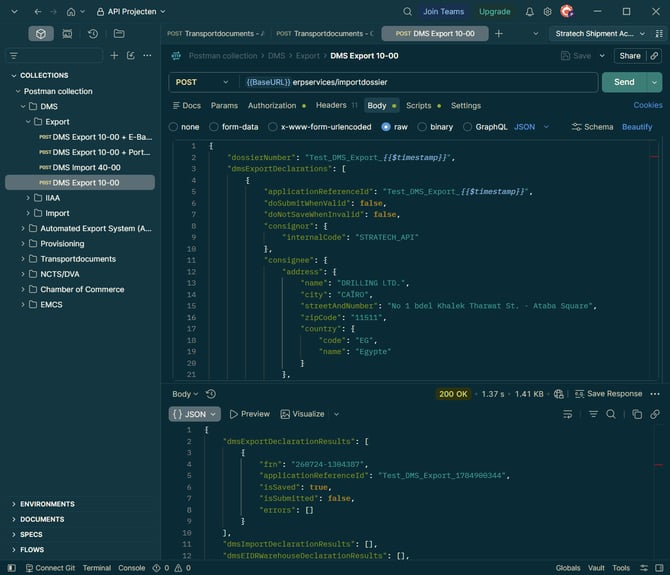
Click **Send** to submit the request.
Successful Response Example
The response below indicates that the declaration has been successfully saved.
Response Explanation
- `isSaved: true`
The declaration has been successfully saved in Shipment.
- `isSubmitted: false`
The declaration has not yet been submitted.
- `errors: []`
No validation or processing errors were found.
Common Errors
400 Bad Request
| HTTP Response Code | Name | Explanation |
| 200 | OK | Connection was successful |
| 400 | Bad Request | The request could not be processed because the submitted data is invalid. Possible causes: - Required fields are missing. - Invalid field values have been supplied. - Incorrect JSON formatting |
| 401 | Unauthorized | Authentication failed. Possible causes: - Incorrect API username or password. - Invalid Client ID or Client Secret. - Expired or revoked credentials. |
| 403 | Forbidden | The request is authenticated, but the account does not have permission to perform the requested action. Possible causes: - Insufficient user permissions. - Access to the requested service is not enabled for the account. |
| 404 | Not Found | The requested endpoint could not be found. Possible causes: - Incorrect BaseURL. - Missing or incorrect trailing slash (`/`) in the BaseURL. - Incorrect API endpoint path. |
| 405 | Method Not Allowed | The endpoint exists, but the HTTP method used is not supported. Possible causes: - Using GET instead of POST. - Using PUT instead of POST. Verify that the request method matches the example provided in the collection. |
| 408 | Request Timeout | The server did not receive a complete request within the expected time. Possible causes: - Temporary network issues. - Connection problems between Postman and the server. Retry the request after verifying your network connection. |
| 500 | Internal Server Error | An unexpected error occurred while processing the request. Possible causes: - Temporary server issue. - Unexpected application error. If the issue persists, contact Stratech Support and provide the request details and response message. |
| 503 | Service Unavailable | The service is temporarily unavailable. Possible causes: - Planned maintenance. - Temporary service interruption. - Server overload. Wait a few minutes and try again. |